
Page 46 - Manual_Polaris_RZR_ProXP-20-21
P. 46
GENERAL INFORMATION
4. Once the installation is complete, launch the Digital 1. Assemble the MultiLink Module and attach the PC
Wrench® software and verify the information in the Interface Cable to your laptop.
lower, right-hand corner matches the new Base
Version you just installed. 2. Remove the protective cap from the Digital Wrench®
connector.
3. Connect the Vehicle Interface Cable to the Digital
DIGITAL WRENCH® COMMUNICATION Wrench® diagnostic connector.
ERRORS 4. Turn the ignition key to the ‘ON’ position, select the
If you experience problems connecting to a vehicle, or appropriate vehicle and wait for the status to display
any other Digital Wrench® software-related problem, visit ‘Connected’ in the lower left corner of the screen.
the Digital Wrench® home page (www.polaris.diagsys. 5. Once connected, proceed with using Digital
com) and locate the following information under Wrench®.
Knowledge Base:
• Errors and Troubleshooting
• Frequently Asked Questions (FAQs)
• Procedures and Solutions
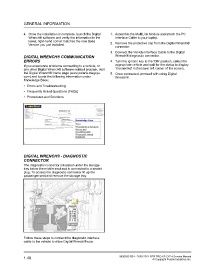
DIGITAL WRENCH® - DIAGNOSTIC
CONNECTOR
The diagnostic connector is located under the storage
tray below the middle seat and is connected to a sealed
plug. To access the diagnostic connector lift up the
passenger seat and remove the storage tray.
Follow these steps to connect the diagnostic interface
cable to the vehicle to allow Digital Wrench® use:
1.40 9930583 R01 - 2020-2021 RZR PRO XP / XP 4 Service Manual
© Copyright Polaris Industries Inc.