
Page 316 - Manual Oficina XP 1000 14-16
P. 316
FINAL DRIVE
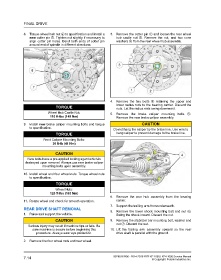
8. Torque wheel hub nut y to specification and install a 3. Remove the cotter pin q and loosen the rear wheel
new cotter pin u. Tighten nut slightly if necessary to hub castle nut w. Remove the nut, and two cone
align cotter pin holes. Bend both ends of cotter pin washers e from the rear wheel hub assembly.
around end of spindle in different directions.
4. Remove the two bolts r retaining the upper and
lower radius rods to the bearing carrier. Discard the
TORQUE nuts. Let the radius rods swing downward.
Wheel Hub Castle Nut:
5. Remove the brake caliper mounting bolts t.
110 ft-lbs (149 Nm) Remove the rear brake caliper assembly.
9. Install new brake caliper mounting bolts and torque CAUTION
to specification.
Do not hang the caliper by the brake line. Use wire to
hang caliper to prevent damage to the brake line.
TORQUE
Front Caliper Mounting Bolts:
30 ft-lb (41 Nm)
CAUTION
New bolts have a pre-applied locking agent which is
destroyed upon removal. Always use new brake caliper
mounting bolts upon assembly.
10. Install wheel and four wheel nuts. Torque wheel nuts
to specification.
TORQUE
Wheel Nuts:
120 ft-lbs (163 Nm)
6. Remove the rear hub assembly from the bearing
11. Rotate wheel and check for smooth operation. carrier.
7. Support the trailing arm from underneath.
REAR DRIVE SHAFT REMOVAL
8. Remove the lower shock mounting bolt and nut y.
1. Raise and support the vehicle. Swing the shock inward. Discard the nut.
CAUTION 9. Remove the stabilizer bar mounting bolt, washer and
nut u. Discard the nut.
Serious injury may result if machine tips or falls. Be
sure machine is secure before beginning this 10. Lift the trailing arm assembly upward so the rear
procedure. Always wear eye protection. drive shaft is parallel with the ground.
2. Remove the four wheel nuts and rear wheel.
7.14 9926816 R06 - 2014-2016 RZR XP 1000 / XP4 1000 Service Manual
© Copyright Polaris Industries Inc.