Page 69 - Manual Oficina Polaris RS1 2018 e 2019
P. 69

MAINTENANCE

                   DRIVE SHAFT BOOT INSPECTION                           WHEEL REMOVAL
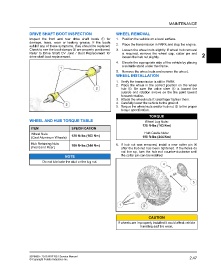
                   Inspect the front and rear drive shaft boots q for    1. Position the vehicle on a level surface.
                   damage, tears, wear or leaking grease. If the boots
                   exhibit any of these symptoms, they should be replaced.  2. Place the transmission in PARK and stop the engine.
                   Check to see the boot clamps w are properly positioned.  3. Loosen the wheel nuts slightly. If wheel hub removal
                   Refer to Drive Shaft CV Joint / Boot Replacement for      is required, remove the wheel cap, cotter pin and
                   drive shaft boot replacement.                             loosen the hub nut slightly.                     2

                                                                         4. Elevate the appropriate side of the vehicle by placing
                                                                             a suitable stand under the frame.
                                                                         5. Remove the wheel nuts and remove the wheel.
                                                                         WHEEL INSTALLATION
                                                                         1. Verify the transmission is still in PARK.
                                                                         2. Place the wheel in the correct position on the wheel
                                                                            hub t. Be sure the valve stem w is toward the
                                                                            outside and rotation arrows on the tire point toward
                                                                            forward rotation.
                                                                         3. Attach the wheel nuts q and finger tighten them.
                                                                         4. Carefully lower the vehicle to the ground.
                                                                         5. Torque the wheel nuts and/or hub nut e to the proper
                                                                            torque specification.
                                                                                             TORQUE
                   WHEEL AND HUB TORQUE TABLE                                              Wheel Lug Nuts:
                                                                                         120 ft-lbs (163 Nm)
                    ITEM                     SPECIFICATION
                    Wheel Nuts                                                             Hub Castle Nuts:
                    (Cast Aluminum Wheels)   120 ft-lbs (163 Nm)                         180 ft-lbs (244 Nm)

                    Hub Retaining Nuts       180 ft-lbs (244 Nm)         6. If hub nut was removed, install a new cotter pin r
                    (Front and Rear)                                        after the hub nut has been tightened. If the holes do
                                                                            not line up, turn the hub nut counter-clockwise until
                                                                            the cotter pin can be installed.
                                         NOTE
                           Do not lubricate the stud or the lug nut.


                                                                                             CAUTION

                                                                          If wheels are improperly installed it could affect vehicle
                                                                                        handling and tire wear.


                   9928689 - 2018 RZR RS1 Service Manual                                                              2.47
                   © Copyright Polaris Industries Inc.
   64   65   66   67   68   69   70   71   72   73   74