
Page 326 - Manual_Polaris_RZR_ProXP-20-21
P. 326
PVT SYSTEM
4. Use a pry bar located between the fingers of the Helix 3. Re-install the retaining fasteners u and movable
to turn the Helix counterclockwise. Turn until bushing sheave i onto the helix o using previous hole
bottoms out. orientation.
IMPORTANT IMPORTANT
Only light force is needed to install the bushing. Do not Using previous hole orientation will ensure the driven
increase pressure after bushing bottoms out, or clutch maintains balance.
damage may result to bushing.
5. Remove nut and spacer adapter from puller rod. Re-
move Helix and bushing adapter from puller rod.
DRIVEN CLUTCH ASSEMBLY
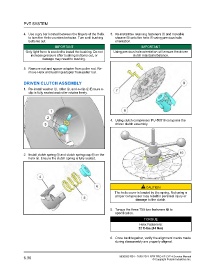
1. Re-install washer q, roller w, and e-clip e Ensure e-
clip is fully seated and roller rotates freely.
4. Using clutch compressor PU-50518 compress the
driven clutch assembly.
2. Install clutch spring t and clutch spring cap y on the
helix r. Ensure the clutch spring is fully seated.
CAUTION
The helix cover is loaded by the spring. Not using a
proper compressor may result in personal injury or
damage to the clutch.
5. Torque the three T50 torx fasteners a to
specification.
TORQUE
Helix Fasteners:
32 ft-lbs (44 Nm)
6. Once back together, verify the alignment marks made
during disassembly are properly aligned.
6.36 9930583 R01 - 2020-2021 RZR PRO XP / XP 4 Service Manual
© Copyright Polaris Industries Inc.