
Page 324 - Manual_Polaris_RZR_ProXP-20-21
P. 324
PVT SYSTEM
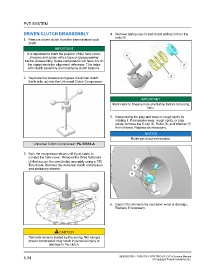
DRIVEN CLUTCH DISASSEMBLY 4. Remove spring cap w and clutch spring e from the
helix r.
1. Remove driven clutch from the transmission input
shaft.
IMPORTANT
It is important to mark the position of the helix cover,
sheaves and spider with a tape or grease marker
before disassembly. Some components will have X’s on
the components for alignment reference. This helps
with clutch assembly and maintains clutch balance.
2. Separate the sheaves and place the driven clutch
(helix side up) into the Universal Clutch Compressor.
IMPORTANT
Mark Helix to Sheave hole orientation before removing
helix.
5. Inspect roller for play and wear or rough spots by
rotating it. If excessive wear, rough spots, or play
exists, remove the E-clip t, Roller y, and Washer u
from sheave. Replace as necessary.
NOTICE
Roller pin is not serviceable.
Universal Clutch Compressor: PU-50518-A
3. Spin the compressor down until it just starts to
contact the helix cover. Remove the three fasteners
q that secure the cam (helix) assembly using a T50
Torx driver. Remove the universal clutch compressor
and stationary sheave.
6. Inspect the sheaves for excessive wear or damage.
Replace if necessary.
CAUTION
The helix cover is loaded by the spring. Not using a
proper compressor may result in personal injury or
damage to the clutch.
6.34 9930583 R01 - 2020-2021 RZR PRO XP / XP 4 Service Manual
© Copyright Polaris Industries Inc.