
Page 372 - Manual Oficina Polaris RS1 2018 e 2019
P. 372
STEERING / SUSPENSION
REAR SUSPENSION 8. Reverse this procedure to reinstall the radius rods.
9. Torque all fasteners to specification.
RADIUS ROD REMOVAL / INSTALLATION
The following procedure details upper and lower radius NOTE
rod removal and replacement on one side of the vehicle. Use new attaching nuts upon installation of the rear
Repeat the following steps to remove the A-arm from the radius rods.
opposite side.
1. Raise and support vehicle by main frame.
TORQUE
WARNING Inner Radius Rod Mounting Bolts:
50 ft-lb (68 Nm) + 45°
Serious injury or death may result if machine tips or Outer Radius Rod Mounting Bolts:
falls. Be sure machine is secure before beginning this 50 ft-lbs (68 Nm) + 90°
service procedure.
2. Remove the rear wheel nuts and rear wheel.
WARNING
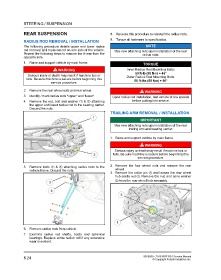
3. Identify / mark radius rods “upper” and “lower”. Upon radius rod installation, test vehicle at low speeds
4. Remove the nut, bolt and washer q & w attaching before putting into service.
the upper and lower radius rod to the bearing carrier.
Discard the nuts.
TRAILING ARM REMOVAL / INSTALLATION
IMPORTANT
Use new attaching nuts upon installation of the rear
trailing arm and bearing carrier.
1. Raise and support vehicle by main frame.
WARNING
Serious injury or death may result if machine tips or
falls. Be sure machine is secure before beginning this
service procedure.
2. Remove the four wheel nuts and remove the rear
5. Remove bolts e & r attaching radius rods to the
vehicle frame. Discard the nuts. wheel.
3. Remove the cotter pin q and loosen the rear wheel
hub castle nut w. Remove the nut, and cone washer
e from the rear wheel hub assembly.
6. Remove radius rods from vehicle.
7. Examine radius rod shafts, boots and spherical
bearings. Replace entire radius rod if any excessive
wear is evident.
8.24 9928689 - 2018 RZR RS1 Service Manual
© Copyright Polaris Industries Inc.