
Page 388 - Manual Oficina Polaris RS1 2018 e 2019
P. 388
STEERING / SUSPENSION
WALKER EVANS SHOCK ASSEMBLY TORQUE
1. Install new seals and O-rings on the seal head Lock Nut:
assembly. 14 ft-lbs (19 Nm)
2. Use the appropriate shock rod holding tool and a vise
to mount the shock rod vertically with the threaded
end upward. NOTE
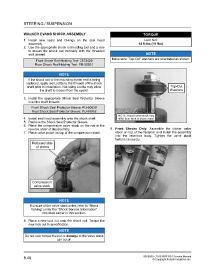
Make sure “Top-Out” washers are orientated as shown.
Front Shock Rod Holding Tool: 2872429
Rear Shock Rod Holding Tool: PU-50931
NOTE
If the shock rod or the mounting eyelet end is being
replaced, apply red Loctite to the threads of the shock
shaft prior to installation. Not using Loctite may allow
the shaft to loosen from the eyelet.
3. Install the appropriate Shock Seal Protector Sleeve
over the shaft threads.
Front Shock Seal Protector Sleeve: PU-50939
Rear Shock Seal Protector Sleeve: PU-50952
4. Install seal head assembly onto the shock shaft.
5. Remove the Shock Seal Protector Sleeve.
6. Place the compression valve stack on the rod in the
reverse order of disassembly. 9. Front Shocks Only: Assemble the clicker valve
7. Place valve piston on top of the compression stack. stack on top of the fastener and install the assembly
into the reservoir body. Tighten the valve stack
fastener securely.
NOTE
If unsure of the valve stack order, refer to “Shock
Valving” under the “Shock Service Information”
provided earlier in this section.
8. Place a new lock nut onto the shock rod. Torque the
new lock nut to specification.
NOTE
Do not over torque the nut or damage to the valve stack
can occur.
8.40 9928689 - 2018 RZR RS1 Service Manual
© Copyright Polaris Industries Inc.